 |
|
 |
 |
 |
 |
 |
 |
 |

|
Avatars are one of the things that set Palace apart from ordinary text-based chat. At Palace, avatars are 2 dimensional images that users "wear" to represent themselves. They allow you to express your identity visually, rather than only through typewritten screen names. When visiting Palace you'll see others dressed in animal, cartoon, anime, and fantasy avatars. You'll see animated and abstract avatars as well as photographic avatars. The choices are endless. You can be anything or anyone you want to be! If you have an idea for an avatar that you would like, you can even make them yourself! This page covers the basics
of collecting avatars when using The Palace Viewer. We'll tell you where
to find them, how to save them and even give a few tips on making them
yourself. Please scroll down or choose a link below to get started.
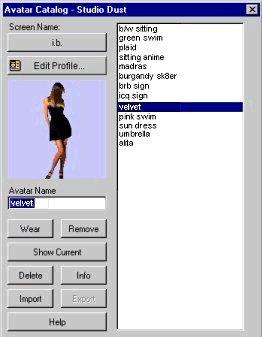
When using the full "client" software, avatars are made up of up to nine pieces, called "props". Together these props can be up to 132 pixels square. TPV avatars (Unibody avatars) are saved as one piece and can be larger. Client avatars can be seen by all visitors and used at any Palace. Avatars made through TPV can only be seen by TPV visitors at this time and the larger ones can not be used at all Palaces. These differences affect many aspects of avatar collecting and will be discussed throughout this page where appropriate. The options related to TPV avatars appear in the Avatar Catalog. We'll begin by explaining each option. To access the
Avatar Catalog, click on the "toolbar icon"
As you collect avatars, they are listed, by the name you choose, in alphabetical order on the right side of the window. The left side of the window shows the currently selected avatar, it's name, and the avatar options buttons. Below you'll find an explanation of each option.
In this section of the Palace Avatars page we'll get you started on your avatar collection with information on where to find the perfect avatars for you. Prop Rooms Prop rooms can be found in many Palaces across Palace Space. A Palace may have one prop room or many. You'll often find that the avatars available in a specific Palace will be related to the theme of that Palace. For instance, a Fantasy Palace may have prop rooms devoted to avatars such as dragons, wizards, elves and fairies. A teen palace will most likely offer sk8er, Limp Bizkit and Korn avatars. An anime Palace will offer anime avatars and an adult Palace will offer racier avatars. Some Palaces may actually offer avatars in many categories. If you know the general type of avatar you are looking for, visiting a Palace with a similar theme may be your best bet for finding what you want. To find a
Palace when you are already in TPV click on the toolbar icon If you are not in a Palace yet, you can get to the Site Directory through the Palace Tools WEB site at www.palacetools.com. Click on the "Palace Index" link. image
and you will be taken to the site map page of the Palace site. Click on "Site Directory" under "Search" to go to the Site Directory. When you get to the Site Directory it's a good idea to bookmark it. You may find yourself here quite often. Type a word related to the theme you are interested in into the keyword box :
Now just click "Search". You will see a list of Palaces related to that theme, along with a description of each Palace. Scroll down until you find something that looks promising. If a Palace has avatars available they will most likely say that in the description. To enter the
Palace you have chosen, simply click the TPV icon When you enter
the Palace you have chosen and the room picture has appeared, look
around the room for a link to the prop rooms. It will say "Props"
or "Avatars" or something very similar. If you don't see
a link, click on the rooms icon Once in the room you will find one of two things. You may find yourself in a "link" room that lists the different categories of props available, each link leading you to a specific room, or you may have gone directly into a prop room. If you are in a "link room", click on the link that interests you. Once in the prop room itself you will find a "Prop Dispenser", or "Prop Generator" as they are sometimes called. Actually, all you will see is the room picture and words such as "Next", "Back" and "Reset". These are the basic parts of a prop generator. Each Palace owner will use their own words so the variation is endless but this is the general idea. There may also be a counter, telling you how many props are in the room, and, as you click, which prop you are currently on. Go to a relatively clear part of the room. Most prop rooms are designed to have clear open areas in the room picture in order to make it easier for you to see the avatars. Once you are comfortable click the "next" button. It may be called "next", "props", " forward" or any of a number of things. When you click on this button you will be dressed in the first offered avatar. Continue to click the button until you find something you would like to keep. While wearing the avatar you have chosen, save it as explained above in the "Avatar Basics" section. A word of warning is appropriate at this point. When using a prop generator it is best to take your time. Let each avatar download completely before going on to the next. Palace operators sometime set scripts in prop rooms to disconnect a user that is changing avatars too quickly because it causes lag throughout the Palace for all users. Use the "Back" button to go back to a previous avatar and use the "Reset" button to start again at the beginning. Once you have cycled through all the available avatars the generator will automatically begin again at the beginning. At this point look around the room for another link. If there are more available avatars in the chosen category, there may be a separate link for "Next room" or "More". There may also be a link back to the prop room entry. Just experiment and have fun. Each Palace will be set up differently. If you started at a Prop room entry, go back and choose another category if you like. Remember that each Palace has designed their prop rooms with their own ideas in mind. Some offer much more than the basics. There are prop rooms where you can change the background to see what the avatar looks like in different rooms. There are prop generators that allow you to click on a button to automatically scroll through the avatars without clicking at all. There are many variations and this information is only meant to give you the basic idea. You'll have fun discovering the options available in each individual Palace. By the way, Studio Dust Palace has a good many prop rooms itself. Please visit us and see what we have to offer. There's a link to Studio Dust at the bottom of each page of this guide. Prop Palaces Prop Palaces are different in that they are totally devoted to offering avatars. Most offer many categories and may have thousands of avatars available. If you're in the mood for a "Prop Shopping" marathon, or haven't really decided on a specific "look", this may be a good place to start. To find a Prop Palace go to the Site Directory following the instructions above. Enter the word "prop" or "prop palace" in the keyword box and hit search. You will be faced with a very large list of choices but it's easy to pick out the Palaces that are actual "Prop Palaces" Their names generally give it away and the descriptions will confirm your guess. Some examples from a recent search would be:
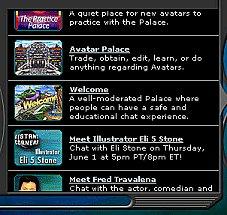
Rather than going to the site directory, you may be able to find a prop Palace that sounds interesting to you using the "Palace Channels".When you connect to the Palace home page at www.thepalace.com, you will see a scrolling list of palaces on the right side of the screen:
Clicking on any Palace in the list will connect you to that Palace through TPV. When you connect to the Palace home page you will see the Palaces in the "Welcome" channel by default. Above the scrolling list there are buttons for the other channels:
Clicking on any of these buttons will load a new channel such as "movies", "romance", or "indie" (independent Palaces). Glance through the Palaces featured on the list to see if there is one that states that they have prop rooms. Clicking on any Palace in the list will connect you to that Palace through TPV. Another good way to find Prop Palaces is to ask around. It seems that everyone has a favorite Prop Palace and you'll get many suggestions if you let it be known that you are on the lookout for one. Get ready to enter a time warp! Prop shopping can be very addictive and Prop Palaces are so much fun you'll keep wanting to see "just one more". Trading Avatars Trading avatars can be the easiest way of all to get started on your avatar collection. Of course you won't have anything to trade at first but this won't stop Palace users from helping you get a start. If you let it be known that you're new to Palace and would like to have an avatar to wear someone will most likely come to your rescue. The first question asked of you will be "what kind are you looking for". After reading this much of the Avatar section of our guide you should have a basic idea of what's available. If you're not sure what you would most like, just give a general answer such as male, female or cartoon. A little more description is helpful but at least that's a start. One or more people in the room will start to change into avatars that they are willing to share. Just say "yes" if you see one you'd like. If you see something that is even along the lines of what you might like let them know that too. It will narrow down their search. Please be polite. You'll find that many people are willing to spend time helping you out if you are willing to take the time to wait while they look for avatars they are willing to share. If no one seems to be willing to help you out, just go to another room or Palace and ask again. I don't think you'll have a bit of trouble finding a good Samaritan at Palace. How do you go about getting the avatar they are offering to you? Offer / Accept The easiest way is to use the offer/accept option. If you see the person with the avatar that you want, whispering the word "offer" to you, simply whisper the reply "accept". If this option is available, you will instantly be dressed in the avatar and you can save it as explained above. The problem you may encounter is that not all Palaces have this script available. Palaces that have it available may not have it available in every room of the Palace. If offer/ accept doesn't work for you, ask another user or a moderator if it is available in another room. The person you are trading with may be willing to meet you there to give you the avatar. Offer/accept is the easiest way to trade avatars but if it is not possible, you may be able to trade in a "dressing room". Dressing Rooms Check the room list or ask the person you are talking to if a dressing room is available at the Palace. Dressing rooms are scripted by the Palace owner to make trading easy. As you enter the room, watch your log. The instructions for trading avatars will be listed in the log window. The person you are trading with will simply whisper "dressup" to you and you will be dressed in the avatar. Easy as can be. Other Options If offer/accept and dressing rooms are not available you may have to pass on that particular avatar. The offer/accept script is fairly new but getting more and more common. Dressing rooms have been around for a long time and are available at a large percentage of the Palaces you will visit. Your only other option may be to ask if the person remembers where they got the av and go to that Palace to get it. Of course you can always try looking for willing avatar owners at another Palace, one that offers ways to trade avatars when you are using TPV. TPV / Client Differences When someone offers something you like you may be faced with the differences between the Palace Client software and TPV as mentioned above. Be sure to say up front that you are using The Palace Viewer. Often someone will offer to "drop" or "dump" an avatar for you if offer/accept doesn't work. This means they will drop the pieces of their avatar into the room for you to pick up. Unfortunately TPV users cannot, at this time, pick up loose props from a room. Let them know that it's impossible when using TPV. A future upgrade of TPV will most likely correct this problem. While you will not be able to pick up the props making up an avatar that someone might be offering you, when you have avatars of your own to trade, you can drop them for others that are using the client software to pick up. To drop an av, simply alternate click (right-click) on your avatar. Choose "Drop Avatar" from the menu that appears. Your avatar will be removed and dropped into the room for the other person to pick up.
Client users can edit these props within their client software. TPV users will not be able to edit client made avatars at all. Although a screen print can be made, they will not export from TPV to be edited in a program such as Photoshop or Paint Shop Pro. Avatars made for the client software are gif files with the Palace Palette applied. The Palace palette is very limited, making it difficult to get the colors just right. Avatars made through TPV, Unibody Avatars, can be either gif or jpg and no special palette needs to be applied before importing them. The colors are richer and more varied. Client avatars must be no bigger than 132 pixels by 132 pixels. They are made up of up to 9 "props" that are 44 x 44 pixels each. Unibody avatars can be any pixel size that you would like to make them and up to 14k in file size. The size is restricted however by settings in the Palaces you visit. At least one Palace now allows TPV users to wear avatars up to 132 pixels wide by 192 pixels tall. If your avatar is bigger and a Palace allows Unibody avatars, TPV will automatically scale it down for you so that you can still wear it. The most important aspect of these differences is "Who can see what?" TPV users can see any avatar that a visitor wears, no matter what the visitor is using to visit the Palace. Client users, at this time, cannot see Unibody avatars made through TPV. If you wear a Unibody avatar, client users will see you as a default "smiley". You will look like a small smiling yellow ball to them. With all these thoughts in mind you can decide if you would like to make your own avatars through TPV. If you decide you would rather use the client software to make avatars, the software is free and available through the Palace web site. If you've decided to try your hand at making Unibody avatars you'll find the basics of the process below. These are general guidelines and we don't mean to go into great detail here. We assume you know the basics of using your graphic software and won't be going step by step through each necessary click. The guidelines should be applicable to all graphics editors. Keep in mind also, that everyone goes about making avatars in their own unique way. This is meant to get you started. As you make more av's you'll find many things you can do to improve the final product. Finding An Image Any image can be used to make an avatar. You can scan your own or use one you've found on the web. Please keep copyright issues in mind as you look for images to make into avatars. You'll find that the easiest images to use are those that have a solid background but it is possible to use any image you like. Making the Avatar Open the image in your graphics editor. These directions can be applied in any graphics editor but we'll give a few specifics for Paint Shop Pro and Photoshop 1. Convert the open image to RGB or increase the colors to 24 bit if necessary.. Photoshop: Click "Image" in the toolbar and choose "Mode", then "RGB color" Paint Shop Pro: Click "Colors", and choose "Increase color depth" then "16 million colors". 2. Crop the image down to a rectangle including only the part of the image that you want to include in your avatar. 3. At this point you will want to sharpen your image. This will add to the clarity of the image when you reduce the size. The larger the image, the more it should be sharpened. With large images it's sometimes best to sharpen "a bit too much". 4. Now reduce the size keeping in mind the size limitations discussed at the beginning of this section. Sharpen the image again, if necessary, and make any color adjustments that you need. 5. Use the various selection tools to select and delete the background of the image if you will want part of it to be transparent. If there are expanses of solid color, you might wish to start with the magic wand tool. Use the other tools to do the detail work. When the background is selected, click the delete key to change this area to a solid color (the current background color, a contrasting color is best.). 6. Clean up the selection by adding to it or subtracting from it using the paint brush or pencil tool. 7. It's now time to save your avatar. Unibody avatars can be either gifs or jpg files. If you are not familiar with the different file types and when it's best to use one or the other, check the help file in your graphics software. If part of the image is to be transparent, you'll want to save the image as a gif file and it must have no more than 256 colors. Be sure to reduce the color before saving. If the final image is square or rectangular and needs no transparency you can save it as a jpg.
To Save as a jpg in Paint Shop Pro:
Go to any
Palace and find an empty room where you can concentrate on what you're
doing. Open the "toolbar" icon
Exporting an Avatar If you find you need to do a little more work on the avatar or there is something you'd like to add or delete from it, simply click on it's name in the Avatar Catalog and click "Export". A window will pop up where you can choose a folder in which to save the avatar on your hard drive. Navigate to the folder you would like to use, enter an appropriate file name, and click "Save". Open the file in your image editor and make the changes you need. When you're finished, import it into TPV once again as explained above..
Below you'll find a few quick tips on Palace avatars :
*** NOTE *** The Palace Viewer is no longer supported by communities.com OR If you
prefer to go straight to Studio Dust Palace, using
|