 |
 |
 |
 |
 |
 |
 |
 |

|
Starting out with The Palace Viewer is a simple process. Just click wherever you see the TPV icon link on any Palace related web page to download and install the Viewer applet automatically. It's quick and easy! TPV is a signed applet that downloads a few files and settings to your browser. It will also update automatically whenever a new version is released. This page will give you basic information on system requirements, downloading the applet, registering with Communities.com and a lot more. Please scroll down or choose a link below to get started.
* NOTE: Currently, TPV is not supported in Foreign browser versions of Internet Explorer. Communities.com is investigating workarounds for this problem so look for support, hopefully, in the near future.
As we stated
above, you can connect to Palace Space from any web page that includes
a TPV link Just look for this button Alternately you can connect from the main Palace web site at www.thepalace.com using the channels that you'll find on the home page. Just click any Palace pictured in the scrolling screen to connect. Above the scrolling screen you will see links to other "channels", such as Teen, Music, Romance and Indie. Click on one of the links to see the Palaces available in that "channel" The "Channels" only list a small percentage of the Palaces available. The Palace web site also includes a Site Directory that lists all Palaces currently open to the public in Palace Space. You can find out more about these connection options on the "Moving at Palace" page of this guide. It's important that you bookmark the page that you are on before you click the button or one of the channel Palaces. At one point in the following process it is recommended that you restart your computer, and this will make it easier for you to reenter the Palace you've chosen once you've downloaded the applet. To make connecting the first time easy for you, we've put a TPV link to Studio Dust Palace, like the one pictured above, at the bottom of each page of this guide. When you're ready, just click the button. We'd love to meet you! When you click the button you'll be prompted to start the download process.
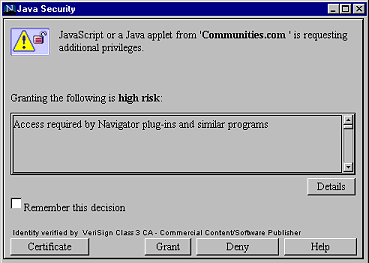
We won't go into detail in explaining the TPV download process here. It's very easy and you'll be prompted at each step along the way. Just read each screen thoroughly before going on to the next. There is one thing that may need a bit of further explanation. Because The Palace Viewer is a signed applet you will see a window asking that you grant The Palace Viewer special privileges to load onto your computer:
You will need to click "Grant" (on Netscape) or "Yes" (on Internet Explorer) to continue. The download process will continue, showing you the progress along the way. It doesn't take long, just a few minutes on a 56k modem. Once The Palace Viewer is installed you will be prompted to register with Communities.com.
We suggest that you register at this point. It's not necessary to do it at this time, you can click the "Cancel" button on the window and continue on. You can use an unregistered Palace Viewer for three days and you will be prompted to register each time you connect. We recommend registering at this point, it only takes a few minutes and you'll have it out of the way. The registration page of Communities.com's web site will open in a new browser window. You must fill in all fields of the form to register your Palace Viewer. If you are under the age of 14, please have your parents read the "Privacy Statement" mentioned in the upper left section of the page. There's a link to the statement right there. Check the box at the bottom of the form if you would like to receive The Palace Newsletter by e-mail. * IMPORTANT: Be very careful to enter your e-mail address into the form correctly. This is the address that Communities.com will use to send you your registration code. When you have completed the form, click the "Complete My Registration" button at the bottom of the page. Now close your browser, disconnect from your isp and restart your computer. This is important because if you start to collect avatars on your first visit they may not save properly if you haven't restarted. When you get back online and open your browser, check your e-mail. You should find a letter from Communities.com explaining how to complete your registration. Follow the instructions and you're all set to visit Palace. * IMPORTANT: Save this e-mail in a safe place on your computer or print it out and put it somewhere that you can find it easily. You will need the information later to edit your Profile Page (Discussed further down on this page). You may also need it later if you download the full Palace Client program or The Palace Personal Server. Go back to the original page, the one you bookmarked, and click the TPV button. You'll be taken directly to the Palace you have chosen.
The Palace Viewer screen will appear. You will see each step in the connection process highlighted on the screen. As you connect, an Introductory Help Page will pop up in front of the screen. Read the tips (you won't need them if you've checked out all the pages in this TPV guide). then check the box in the lower right hand corner if you don't want to see the Help page on subsequent visits. Before connection is complete you will be given an opportunity to choose a screen name. You can enter your own name if you'd like, but last names are not necessary. If you'd rather use a nickname that's just fine. The most important thing is to choose a name that you'll be comfortable with. And remember, you can always change your name from inside the Palace. You'll find more information on changing your screen name on the "Palace Avatars" page of this guide. More information on choosing a name is available on the "Guidelines page. Once you've typed in the name you want to use, click "Enter". Welcome to Palace! If you'd like to find out about communicating at Palace, moving in Palace Space, getting your first avatar and a lot more, visit the other pages of this guide before you go.
Once you're comfortably settled in you might want to take a look at the Profile Page that is available to you once you've registered TPV. Your Profile Page is a web page that gives information such as your name, e-mail address, favorite Palaces, and interests to other users. You have the option of making it available for others to view or not. You can access
and edit your Profile Page from within TPV. Open the toolbar by clicking
on the "Toolbar Button" At the bottom of the form you can select whether you want to list your Profile Page in the Palace Profile Directory and whether you want to prevent people from knowing where you are in Palace Space when you are visiting. When your Page is as you want it, click "Update My Profile Page". To Edit your list of Interests, click "Edit My Palace Interests. If you would like to change your Profile Page at a later time use the method above or just alternate click (Right click on a PC or control-click on a Mac) your avatar and select "Goto Profile Page". Your Profile Page will open in a new browser window. You can access the Palace Profile Directory at http://www.thepalace.com:8000/perl/idsearch.pl (This link will open in a new browser window. Just minimize or close that page to return here.) *
IMPORTANT: If you lose your registration code click on "help"
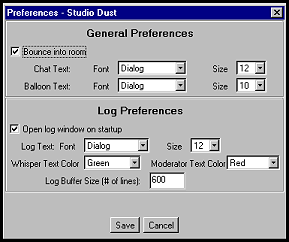
There are a few preferences available on TPV that can be changed by the user if desired. They can be changed in the "Preferences" window which is accessed through the toolbar. First click
on the "Toolbar" button at the bottom right of your TPV screen
:
Set your preferences by using the drop down menus for font type, sizes and color. You can pick from 9 fonts, 4 sizes and 13 colors. Notice that the top half of the window pertains to your "on screen" text, and the bottom half pertains to the text in your log. It's best to leave the buffer size at the default of 600 lines for a start. The buffer determines where the log will begin when you save it to your hard drive. In this case it will begin up to 600 lines of the text logged before you hit the save button. There is one other option available in the Preferences window, "Bounce into room". If this option is checked, when you enter a room you will appear to bounce down and back up. To everyone else in the room you seem to be "landing" in one spot, they won't see you bounce. This is helpful when entering a busy room because you can immediately see where your avatar is located. Click "save" when you have your preferences set the way you like. That's all there is to it.
This is an easy one! Just like any other web page, all you have to do to disconnect from The Palace Viewer is go to another page. Click the "Home" button on your browser, click on a link in your bookmark or favorites file, or simply close your browser. That's all there is to it!
Below you'll find a few quick tips of interest to new TPV users :
|


